Case categories are essential for organizing and classifying visa applications in AdviserAide. Immigration law requires advisers to distinguish between different visa types (such as Student Visa, Work Visa, Permanent Residency, Visitor Visa, etc.), and these vary from country to country. Categories help you filter, group, and manage cases more effectively.AdviserAide comes pre-configured with default categories based on your country’s most common visa types to help you get started quickly. You have complete control over these categories you can use the defaults as-is, customize them to match your practice, create additional categories, disable ones you no longer use, and configure how they appear in your workflow.
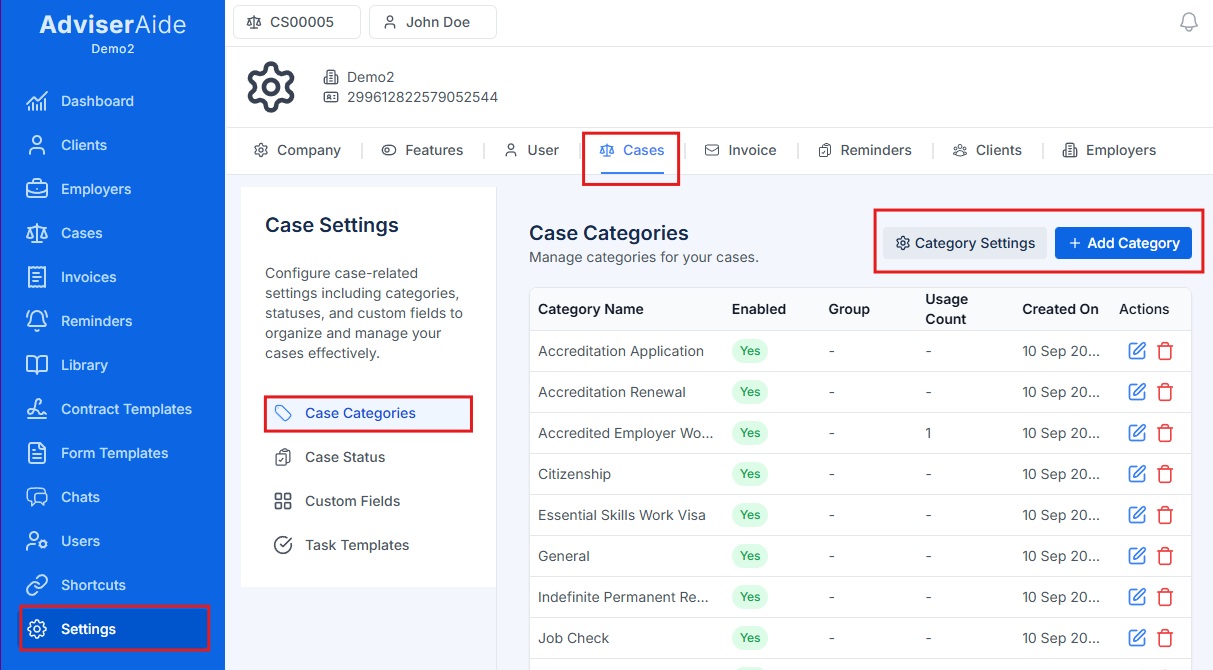
The Case Categories page displays all your categories in a table format with the following information:
Category Name – The name of the category (e.g., “Student Visa”, “Work Visa”).
Enabled – Shows whether the category is active (Yes) or disabled (No).
Display Order – The custom sort order number for this category. This column only appears if you’ve selected “Display Order” in Category Settings.
Group – The visa group this category belongs to (e.g., “Visitor Visa”, “Work Visa”).
Usage Count – Shows how many cases are currently assigned to this category. This helps you understand which visa types are most commonly used in your practice.
Created On – The date when the category was created. Hover over this field to see who created the category.
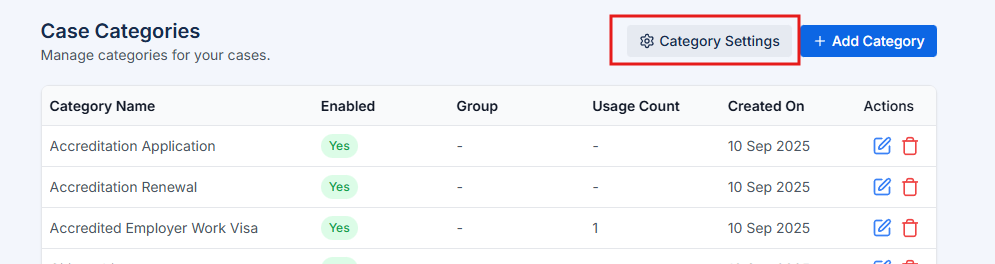
You can click on any category row to open it and view its full details or make edits.
When you set up AdviserAide for the first time, some countries will have commonly used categories automatically created for you. However, you’re free to edit these pre-configured categories or create your own custom categories that match the specific visa types you handle in your practice.
1
Click Add Category
On the Case Categories page, click the Add Category button in the top-right corner.
2
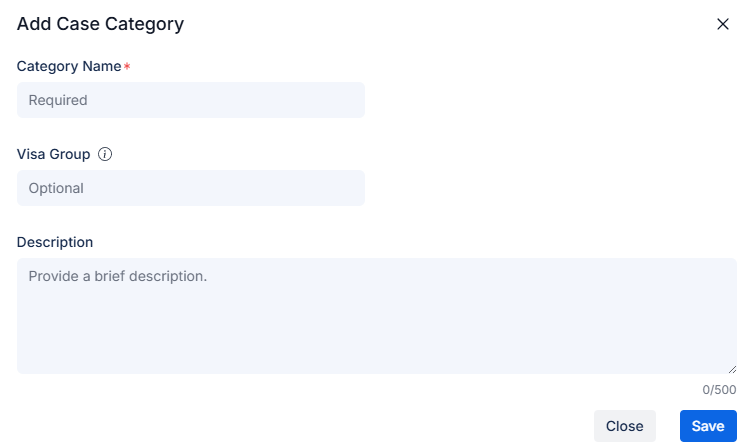
Fill in category details
The Add Category modal will appear. Complete the following fields:
Category Name (required) – Enter a descriptive name for the category (e.g., “Student Visa”, “Skilled Migrant Visa”).
Description (optional) – Add a brief description to help your team understand when to use this category (max 500 characters).
Display Order (optional) – Enter a number to control the order when using manual sorting (e.g., 10, 20, 30). This field only appears if you’ve selected “Display Order” in Category Settings. Set the display order for this category - enter a number to position it in the list and all other categories will automatically adjust their order accordingly.
Visa Group (optional) – Group similar categories together (e.g., “Visitor Visa” can include multiple visitor visa types like Tourist, Business Visitor, etc.). This field only appears if Category Ordering is enabled in settings and helps organize related visa types under common headings.
3
Save the category
Click the Save button at the bottom of the modal. A success message will appear confirming the category has been created.
The new category will now appear in your category list and will be available when creating or editing cases.
When you no longer use a particular category but don’t want to delete it (because it’s linked to existing cases), you can disable it. Disabled categories:
Remain visible on existing cases where they’re already assigned.
Do not appear in the category dropdown when creating or editing cases.
Can be re-enabled at any time if you need them again.
1
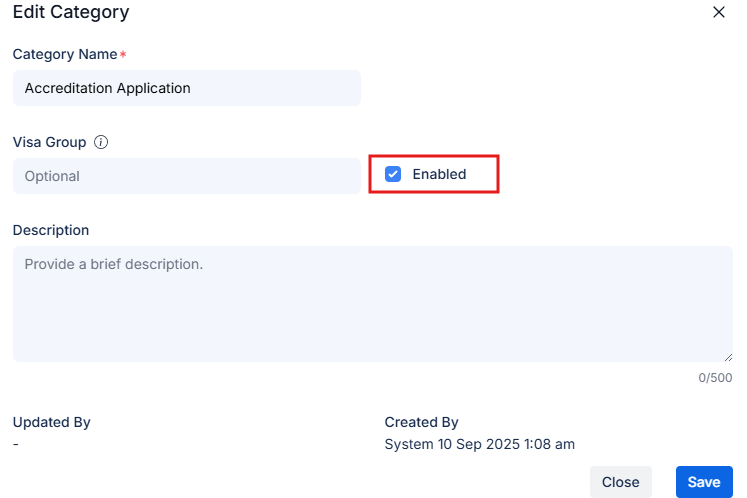
Open the category
Click the category you want to disable from the list.
2
Disable the category
In the Edit Category modal, locate the Enabled toggle switch and turn it off.
3
Save changes
Click Save. The category status will change to “No” in the Enabled column.
To re-enable a disabled category, simply open it again, toggle the Enabled switch back on, and save.
You can only delete categories that are not assigned to any cases. If the category is linked to existing cases, tasks, or forms, you must disable it instead.
1
Select the category
From the Case Categories list, find the category you want to delete.
2
Click the delete icon
Hover over the category row and click the delete icon (trash bin) that appears.
3
Confirm deletion
A confirmation dialog will appear asking you to confirm. Click Delete to permanently remove the category.
If the deletion fails with an error message, it means the category is still being used by one or more cases. In this case, you should disable the category instead.
AdviserAide gives you flexibility in how categories are ordered when you’re creating or updating cases. By default, categories appear alphabetically, but you can choose from four alternative ordering methods to better match your workflow and practice needs.
Alphabetical (default) – Categories ordered A to Z by name. Simple and requires no setup.
Display Order – Categories ordered by custom display order numbers (set when creating or updating categories). Your most important visa types always appear first.
Most Used – Most frequently used categories first. Categories automatically surface based on how often they’re used in your practice.
Most Used with Visa Group – Visa groups with most categories shown first, then most used categories within each group. Combines grouping with usage frequency.
Visa Group Only – Visa groups ordered A-Z, categories alphabetically within each group. Perfect for organizing related visa types together.
The ordering preference applies organisation-wide to all users when they select categories during case creation or editing.
Categories are sorted alphabetically by name (A to Z). This is the default and simplest option.What it does:
Sorts all categories in alphabetical order by their name
No configuration needed - works automatically
Display Order and Visa Group values are ignored
Best for: Organisations with a straightforward list of visa types that are easy to scan alphabetically.Example order:
Partner Visa
Student Visa
Visitor Visa
Work Visa
Custom Ordering Trick: Even with alphabetical sorting, you can control the order by prefixing category names with numbers. For example: “01 - Student Visa”, “02 - Work Visa”, “03 - Partner Visa”. The numbers will cause them to sort in your preferred order (01, 02, 03, 10, 11, 12, etc.) while still using the simple alphabetical method.
When to use: Choose this if you want a simple, predictable ordering that doesn’t require any setup or maintenance. This is ideal for most practices.
You manually assign a display order number to each category. Categories with lower numbers appear first.What it does:
Sorts categories by the Display Order number you assign (lowest to highest)
Categories without a Display Order value appear at the end, sorted alphabetically
Gives you complete control over the exact sequence
When you add a new category with a specific Display Order, all other categories will automatically adjust their order accordingly
Visa Group values are ignored
Best for: Organisations that want specific categories (like priority visa types) to always appear at the top of the list.How it works:When you create or edit a category and assign it a Display Order number, AdviserAide automatically positions it in that spot and adjusts other categories as needed.Example:Current categories:
Work Visa (Display Order: 10)
Partner Visa (Display Order: 20)
Visitor Visa (Display Order: 30)
You add: Student Visa with Display Order: 15Result:
Work Visa (Display Order: 10)
Student Visa (Display Order: 15) - inserted in the middle
Partner Visa (Display Order: 20)
Visitor Visa (Display Order: 30)
Use gaps between numbers (e.g., 10, 20, 30) when setting up your categories. This makes it easier to insert new categories later without disrupting the entire sequence.
When to use: Choose this when you handle specific visa types more frequently than others and want them to always appear first in the dropdown. For example, if 80% of your cases are Work Visas, set Work Visa to Display Order 10 so it’s always at the top.
Categories are ordered by how frequently they’re used in your cases. Your most common visa types automatically appear first.What it does:
Sorts categories by usage frequency (most used first)
Usage counts update automatically as you create and edit cases
Display Order and Visa Group values are ignored
Adapts to your practice’s changing workload over time
Best for: Organisations that want their most frequently processed visa types to always be easily accessible.Example:If your recent caseload shows:
Work Visa: 120 cases
Student Visa: 85 cases
Partner Visa: 45 cases
Visitor Visa: 30 cases
The ordering would be:
Work Visa (120 cases) ← Most used
Student Visa (85 cases)
Partner Visa (45 cases)
Visitor Visa (30 cases) ← Least used
Usage counts are calculated from your actual case data and update automatically as you create and edit cases. AdviserAide tracks how many cases are assigned to each category.
When to use: Choose this if you want a simple, usage-based ordering that automatically prioritizes your most common visa types. The ordering will naturally adapt as your practice’s case mix changes over time.
This is the most dynamic ordering method - it combines visa group organization with usage frequency to surface your most commonly used visa types.What it does:
Groups categories by their Visa Group
Calculates how many categories are in each visa group
Shows visa groups with the most categories first
Within each group, shows the most-used individual categories first
Display Order values are ignored
Usage counts update automatically as you create and edit cases
Best for: Organisations handling multiple visa streams and wanting frequently used categories to be easily accessible while maintaining logical groupings.Real-world example:Let’s say you’ve organized your categories into visa groups:Visitor Visa Group:
Tourist Visitor (60 cases)
Business Visitor (40 cases)
Family Visit (25 cases)
Work Visa Group:
Essential Skills (50 cases)
Skilled Migrant (30 cases)
Student Visa Group:
Full-time Study (85 cases)
If your practice has these visa groups set up:
Visitor Visa group: 3 categories (125 cases total)
Work Visa group: 2 categories (80 cases total)
Student Visa group: 1 category (85 cases total)
The ordering would be:
Visitor Visa (3 categories) ← Group with most categories shown first
Tourist Visitor (60 cases) ← Most used within group
Business Visitor (40 cases)
Family Visit (25 cases) ← Least used within group
Work Visa (2 categories) ← Second-most categories
Essential Skills (50 cases)
Skilled Migrant (30 cases)
Student Visa (1 category) ← Smallest group
Full-time Study (85 cases)
Visa groups with more categories appear first, then within each group, categories are sorted by usage frequency. This helps surface both popular visa streams and the most-used options within those streams.
When to use: Choose this if you have related visa types grouped together and want both the grouping structure and usage patterns to determine the ordering. This is ideal for practices that handle multiple visa streams and want popular options within each stream to be easily accessible.
Categories are grouped solely by their Visa Group name, ordered alphabetically by group. No usage-based sorting is applied.What it does:
Sorts visa groups alphabetically (A-Z)
Within each group, categories are sorted alphabetically
Usage counts and Display Order values are ignored
Provides a consistent, predictable ordering based on your grouping structure
Best for: Organisations that want a clean, alphabetical grouping structure that doesn’t change based on usage patterns.Real-world example:If you’ve organized your categories into visa groups:The ordering would be:
Partner Visa (alphabetically first group)
Partner (Permanent)
Partner (Provisional)
Partner (Temporary)
Student Visa (alphabetically second)
Exchange Student
Full-time Study
Language Course
Visitor Visa (alphabetically third)
Business Visitor
Family Visit
Tourist Visitor
Work Visa (alphabetically last)
Essential Skills
Skilled Migrant
Working Holiday
This provides a predictable, alphabetical structure where related visa types are grouped together, making it easy for your team to find what they need.When to use: Choose this if you want to organize related visa types together in a clean, alphabetical structure. This is particularly useful when:
Your team is familiar with your visa grouping structure
You want a consistent ordering that doesn’t change based on case volume
You prefer logical groupings over usage-based prioritization
You have multiple variants of visa types that should be grouped together (e.g., different types of visitor visas)

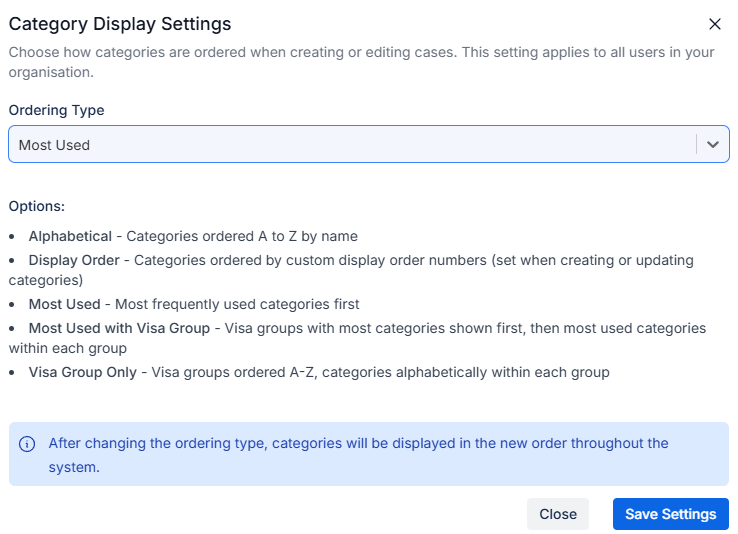 The modal displays five ordering options with descriptions: